Engikeeb: An Experimental Ultra-low-cost Keyboard
Designing a Single Board Keyboard
While thinking of ways to make mechanical keyboards more affordable, I had an idea for a "Single Board Keyboard" (SBKB): a single PCB intended to be the entirety of the keyboard. No case required. No switch plate required. Minimal soldering required. Such a PCB would have:
- holes for low-cost rubber feet to be inserted into and provide for a six degree or zero degree typing angle or
- a footprint for ProMicro-compatible microcontroller boards (ProMicro, Bonsai C4, and nice!nano)
- inexpensive surface mount diodes pre-installed per-switch to reduce assembly time (and potential error)
- other inexpensive support parts pre-installed, like a reset button, a slide switch, a JST connector for batteries, shift registers (to simplify the switch matrix), and status lights.
- support for multiple layouts, with each switch location marked to indicate the intended key size
- the option to add displays and/or an encoder
The slide switch could perform two different roles: for wireless use with a nice!nano it serves as a power cutoff switch, and for wired microcontrollers it can operate as a configuration switch that does whatever you want, such as switching between MacOS/Windows mode or disable/enable the status LEDs.
The target cost for the PCB seemed like it should be around $10 or less.
After letting the idea simmer for a few months while working towards the EVO70 R2 group buy (which ends January 31), I decided to try making a prototype SBKB. Part of me just wanted to test the concept to see if it was actually viable, and the other part simply wanted a dirt-cheap full size QMK mechanical keyboard to use for myself (because I was still using a full-size membrane keyboard). Making an SBKB would also give me the motivation and excuse to learn how to make use of ZMK for wireless as well. By supporting a variety of layout options, I could also cheaply experiment with both a traditional layout and interesting options like split backspace, split spacebar, WKL, HHKB, etc.
Here is the schematic for Enigkeeb (with minor corrections applied):

If you read no further, here's a quick summary of the results:
- Ultimately it worked! I got both wireless (nice!nano) and wired (ProMicro and Bonsai C4) versions operational.
- I learned how to use ZMK.
- It was very inexpensive, just as I had hoped. I made 60 prototype boards (30 full size, 30 southpaw full size), and each board cost just $10.73 to make and ship to me.
After testing it out, there were only two significant concerns with the SBKB concept, neither of which were showstoppers. First, the board can flex a lot--so much so that it can interfere with spacebar stabilizer operation when not resting flat on a desk. Second, the board really needs to be tape-modded (I used butyl tape) to protect the exposed electrical connections on the bottom side of the board. Acrylic covers over the microcontroller on top is also highly recommended as well.
Meet Engikeeb

Engikeeb is a full size, ultra-low cost, highly configurable keyboard, with a unwavering focus on functionality. I liked that it wouldn't hurt my wallet much to buy multiples of them, and I could quickly and easily populate them with cheap switches and stabs in a variety of configurations. If I found that I didn't care for a particular layout after trying it, it wouldn't be a big loss to discard it or donate it to a friend. The best part: because diodes are pre-installed on the PCB, I wouldn't even need to hand-solder in the diodes. Because Engikeeb is low cost, it helps enable multiple iterations while exploring different layouts.
After settling in on a favorite layout, I could then build one up with nicer switches, install an encoder, and select from a variety of displays. Engikeeb can support several typical displays:
- 1.3" color LCDs (240x240)
- 0.96" color LCDs (160x80)
- 0.91" monochrome OLEDs (128x32)
- 1.08" monochrome nice!view Sharp display (160x68)
Here are all the supported layouts of Engikeeb (noting that the southpaw version is identical, except the numpad/encoder/displays/USB connection are on the left side).

For my prototype build, I decided to socket the microcontroller and displays, because I planned to swap them out frequently during development.
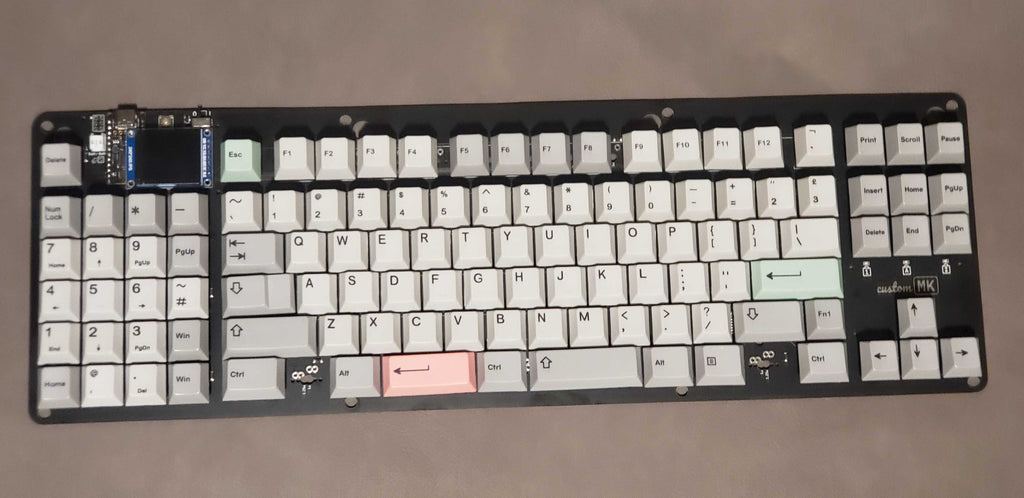
Here is the resulting PCB (this is the southpaw version):

And here is a closeup of the microcontroller and display section:

The center of each switch location is conveniently labeled with silkscreen indicating the size(s) of the keys meant to be installed in each switch location. This came in very handy for the bottom row as it helps find the right placement for each switch, despite supporting a wide variety of layouts.
Upon building up the keyboard, I discovered a few small errors in the design which is not uncommon for first-time-builds:
- Inconsistent net naming for the LCD reset pins meant that one of the LCD pins wasn't wired up. Fixing it required adding a small wire.
- A swapped pin in the ProMicro footprint (particularly one of the ICSP programming pins). Fixing it required cutting a few traces and adding wires
- Flipped footprint for the MOSFET (used for four LEDs and the slider switch). Fixing it required "deadbugging" the MOSFETs...that is, remove them from the PCB, bend all three of their pins/legs backwards, and solder it back in place flipped over, a.k.a. belly up

Design defects like this aren't fun to discover when you've made 60 prototype boards, but it helps to realize that I only made a lot of them because they were incredibly inexpensive.
At quantities of 30 each, the blank PCB cost around $5 each, the parts (with assembly) were around $2 per PCB, and the shipping worked out to be around $3 each. However, that doesn't tell the whole story. If I only made two PCBs of each, I would have spent closer to $75 per PCB because JLCPCB charges setup costs per job, and shipping charges are high even if you only make a handful of boards. So my options at the time of checkout were:
- Spend around $300 for two copies of each board, or
- Spend around $600 for 30 copies of each board
With an incremental cost per board around $5, it was well worth it to get quite a few more--just in case everything worked right the first time.
The Battery Switch
One of the more interesting features of Engikeeb is that the board accepts the wireless nice!nano just as easily as the wired ProMicro and Bonsai C4, and uses a slide switch for both battery disconnect (in wireless mode) and as a settings switch (in wired mode). To achieve this, the board needed a special circuit to handle the battery. Here is that circuit:

In the top right are the battery connections; I allowed for both soldering to thru hole pins (for batteries with pigtails) and for a battery with a standard JST connector.
In the top right is the connection to the bat+ pin of the nice!nano. For ProMicro and Bonsai C4, this happens to be the +5V raw pin.
In the bottom right is a MOSFET that (for all intents and purposes) performs just like a mechanical switch.
When using a battery with nice!nano, the switch physically disconnects the battery from the microcontroller power pin, and harmlessly redirects the battery voltage to the gate of a MOSFET. In the other switch setting, the battery directly connects the battery to the microcontroller as you would want it to do in normal operation.
There is a pull down resistor of 4.7k to ensure the MOSFET gate is in a known low state when the gate is not connected to anything else, but in the future this resistance will be increased a lot, likely to 10Mohm or so, because (1) it passively discharges the battery faster than it needs to at 4.7k and (2) the switch detection speed can be slowed down a lot because it is not used as a typical mechanical switch, and also the gate capacitance of the MOSFET is really low.
With this approach, the raw 5V (which is present when ProMicro or Bonsai C4 is used) or the battery voltage (which is present when nice!nano is used) never reaches the switch matrix pins of the microcontroller. Because there is a MOSFET Q1 between them, this circuit is able to perform the dual roles of a power switch for wireless and a "normal" configuration switch in wired modes.
If you value your time and sanity, shift registers can pay for themselves
In addition to putting surface mount diodes on the board, I also added shift registers for my own sanity. Basically, with the shift registers, I can have a massive number of either rows or columns, all controlled by just three microcontroller pins. Each shift register only costs a few cents, and the 74HC595 shift registers can be chained together and driven through SPI communications. Shift registers are actually becoming so common in keyboards that ZMK even has a built-in driver for them.
The best part of using shift registers is that it lets you use a normal-looking matrix. Normally, to fix 104 keys, you'd need at least 21 keys, and you would "square up" the matrix in a 10x11 grid to fit them all in. Then you're having to keep track of which matrix location corresponds to each physical location on the board, and then which keycodes map to those locations...it can be overwhelming to say the least.
With shift registers, I set up six rows using six pins, and 21 columns using three pins. This produced a nice rectangular matrix that matched my approximate layout, and even left me with three shift register pins to spare (since three shift registers * 8 pins each = 24)...which I conveniently used to drive the three status LEDs.
ZMK
I'm somewhat on the fence about ZMK overall. ZMK is the wireless firmware that I ran on the nice!nano. I figured out how to use it, and sure enough, it works, but it's a very different beast from QMK. With QMK, I can write whatever code I need and the microcontroller will just do it. With ZMK, there isn't (so far) an opportunity to easily inject custom code. The optimal way to approach ZMK is to think of it as just selecting from available options for your keyboard. Each row/column pin is an option you specify, the keymaps are options, even the display is just something you can enable or disable--ZMK manages for you what is actually shown on the display and where things go. This is radically different from QMK; in QMK I was able to do crazy things like convert bongo cat to a font to compress the size for displaying on an OLED. But ZMK is still growing and they have more plans for development in the future. In all fairness, ZMK did work well for what I needed it to do, even if I felt locked out from the relative develoment freedom of QMK.
Minor nitpicks about Engikeeb R1
Two other small findings I made about Engikeeb:
I got the offset wrong by about 0.5u for some of my function keys. If I use the layout with F13, it's not a problem, but using the F12 layout, it's off by a little. Not a big issue, but just something I noticed.
QMK doesn't support multiple SPI buses (yet) so for Bonsai C4, I can't use both the FRAM chip of Bonasi C4 and an SPI-based LCD. This is because the FRAM chip and the LCD displays are on a different SPI buses. I suspect someday in the near future QMK will have better support for this (I've conversed with QMK devs about it, it's on the radar), but in the meantime, it just means I have to use the wear-leveling flash-as-EEPROM if I want to use the LCD displays. Again, no big deal, but just a nitpick.
Conclusion
I absolutely love my Engikeeb, but I'll be the first to admit it's not for everyone. The entire supporting structure is one sheet of FR4, so the flex is quite nice while typing, and with butyl tape all over the back and no case to speak of, the sound while typing is pure thock (particularly the ANSI enter key for some reason).
With the defects in the original design, I'm not inclined to sell the extra PCBs I have simply because of the time it will take me to fix them. And so while it is a good experiment in just how "low cost" I can make the board, in practice I can't actually sell them for so little because there are always other expenses involved (25% import duties for larger orders, boxes/packaging, the rubber feet, labor/handling to pack and ship them, online product support, and optionally some laser cut acrylic pieces to protect the microcontroller and butyl tape for the back side).
That said, if there is interest in SBKBs overall--even for other size keyboards--feel free to let me know on the customMK Discord or via email. If there is enough interest, who knows where things can go from here.